
Previously, we squashed a bug in the game Blindganger that was originally published in 1988. The goal of Blindganger is to guide a blind person out of the sewers and back onto the streets, while avoiding pitfalls as well as the occasional flush of the sewer system.
Blindganger does not use graphics, only sound: The player has to navigate the sewers by ear. At the end of the game, a map of the sewers is displayed, highlighting locations visited by the player in yellow and the exit in white.
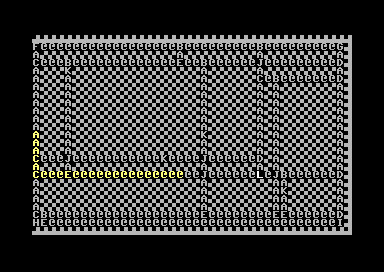
The original visualization of the sewer map.
Even though the correct locations are now highlighted, it is still quite difficult to “read” the map. The internal representation of the maze is simply dumped to the screen as is. Who knows? Maybe the authors felt that “easy” does not build character. Or maybe they had to rush it to meet the publishing deadline.
In this post we will examine the subroutine used to display the sewer map on screen in the original game. Then, we will modify it to produce the visualization shown below. Links to the updated BASIC listing as well as a D64 disk image can be found at the end of the post.
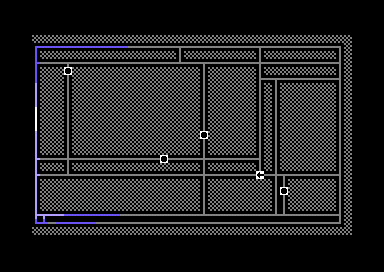
The new and improved visualization of the sewer map.
The sewer map is stored in memory as an area of 1000 bytes starting from address
$6000, organized into a 2-dimensional array of 25 rows by 40 columns. (Note
that the dimensions of this array match the dimensions of standard character
mode. This is what allowed the original authors to display the sewer map by
copying it directly to screen RAM.)
The value of a byte in the sewer map encodes what the player will encounter at the corresponding location in the sewer. The table below shows the value associated with each possible type of map tile. The rightmost column contains the character shown on screen in the original sewer map visualization.
| Value | Tile | Character |
|---|---|---|
| 0 | ═ | @ |
| 1 | ║ | A |
| 2 | ╦ | B |
| 3 | ╠ | C |
| 4 | ╣ | D |
| 5 | ╩ | E |
| 6 | ╔ | F |
| 7 | ╗ | G |
| 8 | ╚ | H |
| 9 | ╝ | I |
| 10 | ╬ | J |
| 11 | Pit | K |
| 12 | Exit | L |
| 254 | Perimeter wall | ▟ |
| 255 | Wall | ▞ |
Visited information is stored in a different area of 1000 bytes starting at
address $7000. When the player visits a location in the maze, 7 is written
to the corresponding address in the visited map. At the end of the game, this
map is copied to color RAM. Color code 7 corresponds to the color yellow, which
explains why visited locations are shown in this color.
So, in the original game, putting the visualization of the sewer map on the screen involved two copy operations:
- Sewer map ($6000) to screen RAM ($0400)
- Visited map ($7000) to color RAM ($D800)
Shown below is the subroutine from the original game used to copy the sewer map to screen RAM.
 1copy_sewer_map:
 2    LDA #$FF
 3    STA $FB
 4    LDA #$5F
 5    STA $FC
 6    LDA #$FF
 7    STA $FD
 8    LDA #$03
 9    STA $FE
10    LDX #$04
11
12copy_block:
13    LDY #$FA
14
15copy_byte:
16    LDA ($FB),Y
17    STA ($FD),Y
18    DEY
19    BNE copy_byte
20
21shift_base_addresses:
22    LDY #$FA
23
24shift_source_base_address:
25    INC $FB
26    BNE shift_target_base_address
27    INC $FC
28
29shift_target_base_address:
30    INC $FD
31    BNE shift_next
32    INC $FE
33
34shift_next:
35    DEY
36    BNE shift_source_base_address
37
38copy_next_block:
39    DEX
40    BNE copy_block
41    RTS
Indirect-indexed addressing is used to copy 1000 bytes in four blocks of 250
bytes. Zeropage locations $FB and $FC contain the 16-bit base address of
the source, $5FFF. Zeropage locations $FD and $FE contain the 16-bit
base address of the destination, $03FF. The Y register is used as the
index.
After copying a block of 250 bytes, the source and the destination base addresses need to be increased by 250. (Otherwise, the next iteration of the inner loop would copy the same 250 bytes that were copied in the previous iteration.)
What is interesting, is how this was implemented. Looking at lines 21-36 we see that both base addresses are being incremented by one, 250 times in a row!
An obvious replacement would be:
21shift_base_addresses:
22    CLC
23    LDA $FB
24    ADC #$FA
25    STA $FB
26    LDA $FC
27    ADC #$00
28    STA $FC
29    LDA $FD
30    ADC #$FA
31    STA $FD
32    LDA $FE
33    ADC #$00
34    STA $FE
Here we simply add 250 to both base addresses directly, while taking care of the carry. This requires 34 cycles, instead of approximately 5250 cycles for the original implementation (per block).
In the new visualization, the color of each map location depends on both the number of times that location was visited and the tile type. For example, the exit and the pits are always shown in white. Although we could use two separate copy operations, we will try to do everything in a single pass.
To read from the sewer map and the visited map and write to the screen RAM and
the color RAM in a single pass using indirect-indexed addressing would require
four base addresses. Or, four pairs of adjacent zero page locations.
Unfortunately, there are only two pairs of unused zero page locations available,
$FB/$FC and $FD/$FE.
To sidestep this issue, we will use indexed absolute addressing instead of
indirect indexed addressing. The difference is that with indexed absolute
adressing, the base address is stored with the opcode instead of in a pair of
zero space locations. For example, LDX $6000, Y is represented in memory as
the byte sequence $BE $00 $66. The two bytes at the end are the base address
$6000 stored in little endian byte order.
Using indexed absolute addressing provides some very real advantages:
- Loads and stores using indexed absolute addressing are one clock cycle faster than those using indirect indexed addressing.
- LDA, LDX and LDY instructions can be used instead of LDA only. This offers more freedom when deciding which registers to use.
- Scarce zero-page locations remain free to be used for other purposes.
However, it also creates a new problem: We need to copy 1000 bytes, but the index register is only 8 bits wide. So, we cannot copy more than 256 bytes using the index register alone. After 256 bytes we need to shift the base address. But as we have seen, the base address is part of the program itself. How should we go about changing it?
The solution is to modify the program in place. That is, we simply overwrite the base address that is stored with the opcode. Code that alters its own instructions at runtime in such a way is known as self-modifying code.
Self-modifying code is uncommon today, because as a rule modern operating systems do not allow a region of memory to be both writable and executable.
Moreover, self-modifying code may actually run slower compared to a piece of code that performs the same function without relying on self-modification. A modern CPU pre-fetches many instructions and therefore may need to flush its instruction pipeline when the instructions being modified are located close to the instruction being executed.
Luckily for us, the C64 does not suffer from the performance penalties caused by modern innovations such as these.
The code block below shows a reimplementation of the copy routine of the original game using self modifying code and indexed absolute addressing.
 1copy_sewer_map:
 2    LDA #$60
 3    STA copy_sewer_map_lda_6000 + 2
 4    LDA #$04
 5    STA copy_sewer_map_sta_0400 + 2
 6    LDA #$00
 7    STA copy_sewer_map_lda_6000 + 1
 8    STA copy_sewer_map_sta_0400 + 1
 9
10    LDX #$04
11    LDY #$00
12
13copy_sewer_map_block:
14copy_sewer_map_lda_6000:
15    LDA $6000,Y
16
17copy_sewer_map_sta_0400:
18    STA $0400,Y
19
20    INY
21    BNE copy_sewer_map_lda_6000
22
23    DEX
24    BEQ copy_sewer_map_done
25
26    CPX #$01
27    BEQ copy_sewer_map_partial_block
28
29    INC copy_sewer_map_lda_6000 + 2
30    INC copy_sewer_map_sta_0400 + 2
31    JMP copy_sewer_map_block
32
33copy_sewer_map_partial_block:
34    LDA #$E8
35    STA copy_sewer_map_lda_6000 + 1
36    STA copy_sewer_map_sta_0400 + 1
37
38    LDY #$18
39    JMP copy_sewer_map_block
40
41copy_sewer_map_done:
42    RTS
On lines 2-8, we initialize the base addresses used in the indexed absolute load
and store instructions on lines 15 and 18 to $6000 and $0400
respectively. These base addresses will be modified later on, so we need to
restore them to their original values at the start (or end) of each call.
We copy 256 bytes (one page) per block instead of 250 like in the original copy
routine. Since we need to copy 1000 bytes in total, this means that the last
block is special. We will get to that later. For each of the first three blocks,
we copy 256 bytes by increasing Y starting from zero until it wraps around
to zero again. Then we need to shift the base addresses by 256. To do so, we
increase the most significant byte of both base addresses by one (see lines 29
and 30).
The last block needs to be shorter: 232 instead of 256 bytes. If possible, we
want to reuse the copy loop on lines 13-21. This loop works by increasing Y
until it wraps around. If we start Y at zero, 256 bytes will be copied. If
we start Y at 24, however, then 232 bytes will be copied. Nice!
But now, we need to adjust the base addresses to compensate for starting the
index at 24. Let’s consider the sewer map base address. Its initial value was
$6000. At the end of the third block, this has been increased to $6200.
The first byte of the fourth block is located at $6300. What should the base
address be if we want to access $6300 with the index set to 24? Well, that’s
$6300 - 24, which is $62E8. The most significant byte of the base
address is already correct. We only need to change the least significant byte to
$E8 (see lines 34-36).
A disadvantage of this approach is that every memory access now has to cross a page boundary and therefore takes an extra cycle. This can be avoided, but the resulting code is somewhat less straight-forward. For the purpose of this post, we will live with the performance penalty.
Below is the code used to produce the new sewer map visualization shown at the beginning of this post. The overall structure is the same as the copy routine showed above. The main differences are:
- Four base addresses are used instead of two, because we need to read from the sewer map and the visited map, and write to screen RAM and color RAM.
- The accumulator is used instead of the
Xregister to count the number of blocks to copy.
And, of course, what happens in the inner loop is different from the byte-for-byte copy in the original game. Conceptually, the inner loop can be split into two parts. The first part (lines 22-32) determines the screen RAM content, while the second part (lines 34-49) determines the color RAM content.
 1copy_sewer_map:
 2    LDA #$60
 3    STA copy_sewer_map_ldx_6000 + 2
 4    LDA #$70
 5    STA copy_sewer_map_ldx_7000 + 2
 6    LDA #$04
 7    STA copy_sewer_map_sta_0400 + 2
 8    LDA #$D8
 9    STA copy_sewer_map_sta_D800 + 2
10    LDA #$00
11    STA copy_sewer_map_ldx_6000 + 1
12    STA copy_sewer_map_ldx_7000 + 1
13    STA copy_sewer_map_sta_0400 + 1
14    STA copy_sewer_map_sta_D800 + 1
15
16    LDA #$04
17    LDY #$00
18
19copy_sewer_map_block:
20    PHA
21
22copy_sewer_map_ldx_6000:
23    LDX $6000, Y
24
25    LDA #$66
26    CPX #$0D
27    BCS copy_sewer_map_sta_0400
28
29    LDA corridor_table, X
30
31copy_sewer_map_sta_0400:
32    STA $0400, Y
33
34    CPX #$0B
35    BCC copy_sewer_map_ldx_7000
36
37    LDA #$0B
38    CPX #$0D
39    BCS copy_sewer_map_sta_D800
40
41    LDA #$01
42    JMP copy_sewer_map_sta_D800
43
44copy_sewer_map_ldx_7000:
45    LDX $7000, Y
46    LDA visited_color_table, X
47
48copy_sewer_map_sta_D800:
49    STA $D800, Y
50
51    INY
52    BNE copy_sewer_map_ldx_6000
53
54    PLA
55
56    SEC
57    SBC #$01
58    BEQ copy_sewer_map_done
59
60    CMP #$01
61    BEQ copy_sewer_map_partial_block
62
63    INC copy_sewer_map_ldx_6000 + 2
64    INC copy_sewer_map_ldx_7000 + 2
65    INC copy_sewer_map_sta_0400 + 2
66    INC copy_sewer_map_sta_D800 + 2
67    JMP copy_sewer_map_block
68
69copy_sewer_map_partial_block:
70    LDX #$E8
71    STX copy_sewer_map_ldx_6000 + 1
72    STX copy_sewer_map_ldx_7000 + 1
73    STX copy_sewer_map_sta_0400 + 1
74    STX copy_sewer_map_sta_D800 + 1
75
76    LDY #$18
77    JMP copy_sewer_map_block
78
79copy_sewer_map_done:
80    RTS
81
82corridor_table:
83    .BYTE $40, $5D, $72, $6B, $73, $71, $70, $6E
84    .BYTE $6D, $7D, $5B, $D1, $9F
85
86visited_color_table:
87    .BYTE $0B, $06, $06, $0E, $06, $0E, $0E, $01
The first part translates tile types read from the sewer map to graphical characters that depict the situation at the corresponding locations in the sewer.
On line 23, the tile type at the current location is read from the sewer map
into the X register. If it is larger than or equal to 13, the screen code
$66 is written to screen RAM, which corresponds to the character ▒. The
table at the beginning of this post shows that the only values larger than 12
are 254 and 255, both of which represent walls. Values below 13 are used as an
index into corridor_table to retrieve the screen code to use (see line 29).
For example, the value 5 maps to screen code $71, which corresponds to the
character ┻.
The second part (lines 34-49) determines the color to use. In the original game,
the visited map was initialized to $0C (middle gray). When a location was
visited by the player, the value at that location was changed to $07
(yellow).
For the new visualization, the color depends on the number of rounds in which a location was visited. (The game consists of three rounds; at the end of each round the sewer is flushed.)
To count the number of rounds in which a location was visited, the visited map is initialized to zero. When a location is visited, a bit is set in the corresponding byte in the visited map. Which bit is set depends on the round number.
For example, suppose a location was visited in the first and the third round,
but not in the second round. Then the first and the third bit of the
corresponding byte in the visited map will be set, resulting in a value of
00000101 (5). The other possible values for a location visited in two out of
three rounds are 00000011 (3) and 00000110 (6).
The visited_color_table look-up table maps a byte from the visited map to a
color code. The colors form a gradient that runs from dark gray, via blue and
light blue, to white. The more frequently a location was visited, the lighter
the color. All locations visited in two out of three rounds will be assigned the
color code $0E (light blue).
On line 34, the tile type at the current location in the sewer map is examined.
For sewer pipes, the color code to use is derived from the number of times the
location was visited. The value of the visited map at the current location is
retrieved on line 45. This value is then used as an index into the
visited_color_table look up table to retrieve the color code on line 46.
Otherwise, if the current location contains a wall, the color code $0B (dark
gray) will be used. The color code $01 (white), will be used for the two
remaining tile types, which are the pits and the exit.
And with that, our discussion of the implementation of the new sewer map visualization comes to an end. Please find below the complete BASIC listing of the Blindganger game using the new visualization.
Related links:
- A modified version of Blindganger 2017 using the new map visualization, as BASIC listing or D64 disk image.